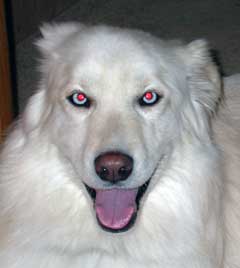
One of my dogs has blue eyes and every time I take a picture of her using a flash, I end up with "demon dog." I’m not sure why Cami’s eyes are particularly problematic, but they are. Red eye happens when the light of a camera’s flash reflects off the retina at the back of the eye.
1. Avoid the problem
To avoid red-eye in the first place, you can tell your subjects not to look directly at the camera when you photograph them. Or you can use a detachable flash to change the angle between the camera and the eye. Of course, I don’t have a detachable flash and my dog is kind of willful on a good day; she doesn’t respond to direction well. Hence I have a lot of photos that look like this:
2. Open the photo in Photoshop
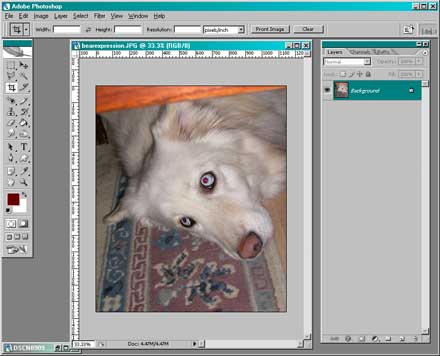
Once you get back to your computer, you can use Photoshop to fix the problem. I plan to use this somewhat goofy picture of Cami in an advertisement, so I need to fix her left eye. (In this case, she doesn’t have both red eyes, she has just one, so you can see that she really does have black pupils!)
3. Zoom in
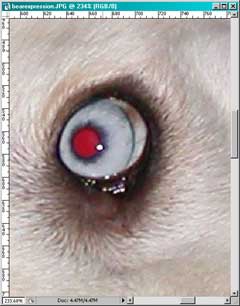
In older versions of Photoshop, you had to use the Color Replacement tool to fix red eye. It was sort of a pain, however, was possible. Basically you would select the red and replace it with the correct color (black in this case). New versions of Photoshop have a dedicated red eye tool, which is much easier to use. To get started, use the zoom tool to get up close and personal with the eye.
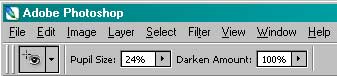
4. Use the Red Eye Tool
Now click the Red Eye tool, which is in the toolbox with the Healing Brush and Patch tool. In the options bar, you can select a pupil size and a darken amount.
5. Click it!
When your settings are ready, you just click in the center of the eye to remove the red. As you can see in the image below, Photoshop darkened the pupil area to black, but the pupil isn’t a solid (fake looking) black. In fact, the new improved non-red pupil looks like the one on the real dog, so I’m satisfied.
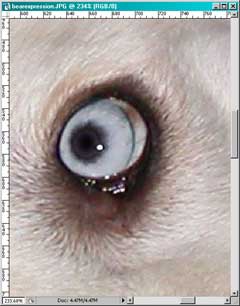
The fixed eye
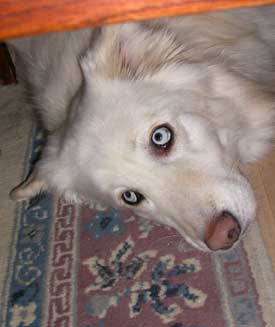
The entire fixed photo (zoomed out)
Depending on the photo, you may have to adjust the settings in the option bar a bit before you get a realistic-looking eye. Fortunately, it’s easy to get rid of your mistakes. If you click and the "corrected" red eye still looks dreadful, just press Ctrl+Z to undo it. If you really get into experimentation, don’t forget the Alt+Ctrl+Z shortcut, which lets you step backward through your actions.
Eventually, with most photos, you should find settings that work. And demon dog becomes a thing of the past!